Tag: Tutorial

  • Position Sizing 101: The Math Behind Every Trade

    Position Sizing 101: The Math Behind Every Trade

    Education · Risk Management · 10 min read

    Most traders who blow up their accounts do not lose because their strategy is bad. They lose because their position sizes are wrong. One trade too big, one stop too wide, one missed calculation on a non-standard instrument — and months of gains disappear in an afternoon.

    The good news: position sizing is math, not magic. Once you understand the formula and the three numbers that feed it, you can size any trade on any instrument correctly, every single time. This guide walks through it from first principles.

    What You Will Learn

    The one formula that works for every instrument, how to calculate each input, why gold and indices break naive lot calculators, and how to get the math right in under 5 seconds per trade.

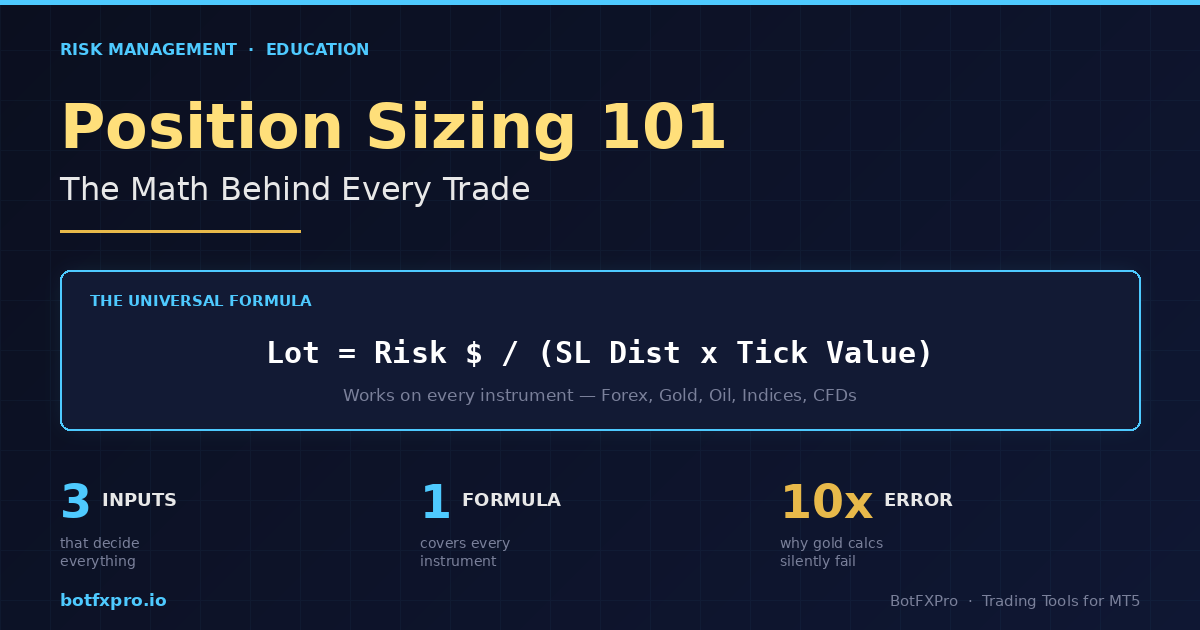
    The Universal Position Sizing Formula

    Every correct lot size calculation reduces to a single equation. No matter what you trade — Forex, gold, oil, indices, crypto — the formula does not change:

    Lot Size = Risk $ ÷ (SL Distance × Value Per Point Per Lot)

    Three inputs. That is it. If you know how many dollars you are willing to lose on this trade, how far your stop loss sits from your entry, and how much money each point of price movement costs you on one lot — you have the answer.

    The reason traders mess this up is not the formula. It is getting those three inputs right, especially the third one. Let us break each of them down.

    Input 1 — Your Risk Amount in Dollars

    This is the easiest one. Pick your risk percentage, multiply by your account balance.

    If your balance is $10,000 and you risk 1% per trade, your risk amount is $100. That is the maximum dollar loss you will accept if this trade hits your stop loss.

    How much should the percentage be? Most professional traders and prop firm rules sit somewhere between 0.5% and 2% per trade. Below that and winners barely move your account. Above that and a normal losing streak wipes you out.

    Quick Reference

    A string of 5 consecutive losses at 1% risk drops your account 4.9%. The same 5 losses at 5% risk drops it 22.6%. This is why small percentages matter.

    Input 2 — Stop Loss Distance

    This is the distance between your entry price and your stop loss price, measured in the instrument’s smallest unit of movement. On EURUSD, that unit is typically a pip. On XAUUSD (gold), it is usually $0.01 or $0.10 depending on broker. On US30, it is 1 index point.

    The critical thing: your stop loss distance is determined by your chart analysis, not by what lot size you want to trade. If the correct technical stop is 50 pips away, that is your stop — you do not tighten it to 10 pips just to trade bigger. Tight arbitrary stops are a direct path to account death.

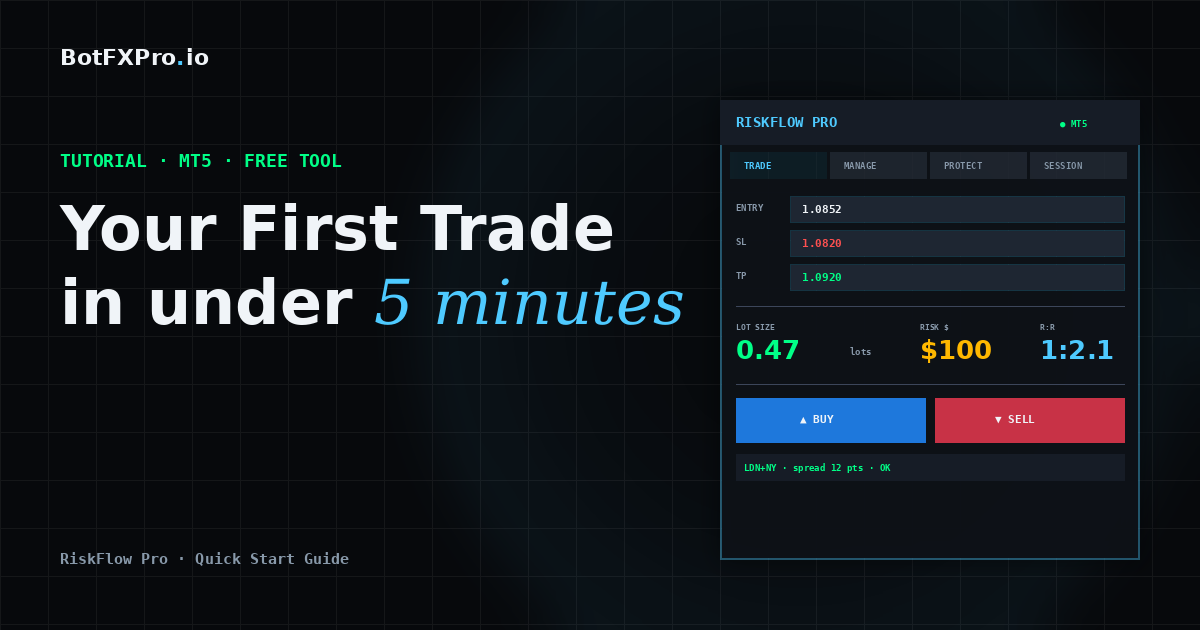
    Worked example on EURUSD:

    • Entry: 1.0850
    • Stop loss: 1.0820 (just below a swing low)
    • Distance: 30 pips

    Input 3 — Value Per Point Per Lot (The One People Get Wrong)

    This is where naive lot calculators — and a lot of traders — go completely off the rails. The value per point depends on the instrument, and it is not the same across your watchlist.

    For standard Forex pairs, the math is familiar:

    • 1 standard lot = 100,000 units of the base currency
    • On EURUSD, 1 pip on 1 standard lot ≈ $10
    • On GBPUSD, same — ≈ $10 per pip per standard lot
    • On USDJPY, close to $10 but varies with the USDJPY rate itself

    Plug those numbers into our formula with the EURUSD example:

    Risk $: $100

    SL distance: 30 pips

    Value per pip per lot: $10

    Lot = 100 ÷ (30 × 10) = 0.33 lots

    So a correct 1%-risk trade on a 30-pip stop at $10,000 balance is 0.33 lots. Not 1 lot. Not 0.1 lots. The math is precise.

    Why Gold, Indices, and Oil Break Naive Calculators

    This is the part that trips up traders — and where most free online lot calculators fail silently.

    On XAUUSD (gold), a “pip” is not well-defined. Different brokers quote gold with 2, 3, or even 4 decimal places. The contract size also varies — some brokers use 100 oz per lot, others use 10 oz. If you assume $10 per “pip” like on EURUSD, your risk calculation could be off by 10x.

    On US30 or NAS100 CFDs, one index point might be worth $1 per lot on one broker and $0.10 on another. Oil (Brent, WTI) is similar — contract sizes and tick values are broker-specific.

    The fix: stop thinking in pips for these instruments. Use Tick Size and Tick Value — two values your broker publishes for every instrument, and that MT5 exposes directly:

    • Tick Size — the smallest price increment (e.g. 0.01 for gold, 1.0 for US30)
    • Tick Value — the dollar value of one tick on one standard lot (e.g. $1 on gold at 100 oz lot size)

    The universal formula rewritten in these terms:

    Lot = Risk $ ÷ ((SL distance ÷ Tick Size) × Tick Value)

    This works for everything. Gold, oil, crypto CFDs, DXY, US30, Bitcoin — every instrument has a published Tick Size and Tick Value, so you just plug them in.

    Common Mistake

    Using a “gold pip calculator” from a website that assumes $1 per pip per mini lot. On a broker that uses 10-oz contracts with 2-decimal pricing, this can under-size your position by 10x — meaning your “1% risk” trade is actually risking 0.1%. The opposite error (over-sizing by 10x) blows accounts in a single trade.

    Worked Example on Gold

    Suppose your broker quotes XAUUSD with 2 decimal places (tick size 0.01), 100-oz contracts, and a tick value of $1 per tick per standard lot. You want to buy gold at 2650.00 with a stop at 2645.00 — a 5-dollar move, which is 500 ticks.

    Balance: $10,000 · Risk 1% → Risk $ = $100

    SL distance: 5.00 ÷ 0.01 = 500 ticks

    Tick value per lot: $1

    Lot = 100 ÷ (500 × 1) = 0.20 lots

    0.20 lots of gold at a 500-tick stop risks exactly $100. Every time.

    Sanity Checks Every Trader Should Run

    Before you click BUY or SELL, run these three quick checks:

    1. Is the risk dollar amount right? If your 1% risk shows as $1,000 when your account is $10k, something is off by 10x.
    2. Is the margin required reasonable? A calculated lot that requires more margin than your free margin means the position will be rejected — you need to either lower risk % or take a tighter stop.
    3. Does the lot round to the broker’s minimum step? If the formula says 0.347 lots but the broker only accepts 0.01 increments, round down to 0.34 — never up.

    The Shortcut — Automate the Math

    Doing this calculation by hand before every trade is slow and error-prone. When markets move fast, you skip the math — and that is exactly when wrong lot sizes get entered.

    The solution is to let MT5 itself handle the calculation. Every instrument in MT5 exposes its Tick Size and Tick Value through the broker’s symbol specification, so a well-written EA can read those values directly and output the correct lot size in real time — no guesswork, no broker-specific table lookups, no pip-vs-tick confusion.

    This is exactly what RiskFlow Pro does. You enter your risk %, your entry, and your stop — it reads the instrument’s real Tick Size and Tick Value from your broker and gives you the correct lot size instantly. Works on Forex, gold, oil, indices, crypto CFDs, whatever your broker offers.

    If you are new to the tool, the Quick Start guide walks you from download to your first properly-sized trade in under 5 minutes. It is free on MQL5 and works on any broker account.

    Practical Tip

    Even if you use an automated calculator, do the manual math on paper for the first 5 trades of any new instrument. This builds intuition for what “correct” looks like and helps you spot calculator errors before they hurt you.

    Key Takeaways

    • Position size is math, not opinion. One formula covers every instrument.
    • For Forex pairs, pip value thinking works. For gold, indices, oil, and CFDs, use Tick Size and Tick Value instead.
    • Your stop distance comes from chart analysis, not from what lot size feels good. Size the position to fit the stop — never the reverse.
    • Automating the math removes the single most common cause of retail blowups: wrong lot size on non-standard instruments.

    Get RiskFlow Pro

    Stop calculating lot size by hand.

    Free MT5 dashboard that does the math for you — on any instrument, any broker.

    Download Free on MQL5 →

    Or read the Quick Start Guide first — you will be trading properly-sized positions in under 5 minutes.

  • MetaTrader 5 Push Notifications & Email Alerts: Complete Setup Guide

    MetaTrader 5 Push Notifications & Email Alerts: Complete Setup Guide

    Tutorial · MT5 · Notifications · 12 min read

    Your Stop Loss just hit breakeven. Your daily drawdown is one trade away from the FTMO limit. Your trailing stop is creeping up nicely on a 30-pip winner. You should know about all of these — but you are not at the computer.

    MetaTrader 5 has built-in support for two notification channels: Push Notifications straight to your phone, and Email Alerts through any SMTP server. No third-party plugins, no monthly subscription, no Telegram bot to maintain. Just configure once and your EA can ping you for any event you care about.

    This guide walks through the complete setup using RiskFlow Pro as the example EA — but the MT5 setup steps work identically for any EA that supports notifications. By the end you will have push alerts on your phone and email alerts in your inbox, firing for the exact events you choose.

    What You Will Set Up

    Push notifications from MT5 desktop to the MT5 mobile app, email alerts via Gmail SMTP (or Outlook, Yahoo, iCloud), and event-level filtering for breakeven, partial close, daily drawdown limit, and trailing stop moves.

    Why Bother with Notifications?

    If you are running an EA, you might think notifications are unnecessary. The EA does the work, right? In practice, three scenarios change that quickly:

    1. Prop firm challenges. You are running an FTMO challenge and your daily drawdown is approaching the limit. A push notification means you stop trading immediately instead of finding out at midnight when you check the account.

    2. Manual oversight on automated systems. Even with auto-management, knowing that your SL just moved to breakeven on a runner trade is useful — you might want to add to the position, or simply enjoy the peace of mind.

    3. Multi-account management. If you trade on more than one MT5 instance or VPS, notifications consolidate everything into one phone or one inbox.

    Part 1 — Push Notifications to Your Phone

    Push notifications send directly from your MT5 desktop terminal to the MetaTrader 5 mobile app. The connection uses a unique 8-digit ID called the MetaQuotes ID. The whole setup takes about 3 minutes.

    Step A: Get Your MetaQuotes ID from the Mobile App

    Your MetaQuotes ID is generated automatically when you install the MT5 app. You can only see it inside the mobile app — it is not shown anywhere on the desktop terminal.

    1. Install MetaTrader 5 on your phone (free on iOS App Store and Google Play) if you have not already.
    2. Open the app and tap the menu icon in the top-left corner.
    3. Tap Messages from the menu.
    4. Tap New Message (or the compose icon). At the top you will see Your MetaQuotes ID: followed by an 8-digit number.
    5. Note the 8 digits — for example 12345678. This is what you need on the desktop side.

    Common Mistake

    The MetaQuotes ID is purely numeric — exactly 8 digits, no letters, no dashes. It is not your username, not your broker login, and not your email. If what you see has letters in it, you are looking at the wrong field.

    Step B: Configure MT5 Desktop

    1. Open MT5 on your computer. Go to Tools → Options (or press Ctrl+O).
    2. Click the Notifications tab at the top.
    3. Check the box for Enable Push Notifications.
    4. In the MetaQuotes ID field, paste the 8-digit number from Step A.
    5. Click Test. Your phone should receive a notification within a few seconds.
    6. Click OK to save.

    If the test does not arrive, check your phone’s notification settings: on iOS go to Settings → Notifications → MetaTrader 5 and make sure Allow Notifications is on. On Android, the path is similar under Settings → Apps → MetaTrader 5 → Notifications.

    Step C: Enable Notifications in RiskFlow Pro

    Now MT5 can send pushes — but RiskFlow Pro also needs to be told to use them. This is in the Protect tab.

    1. Click the Protect tab on the RiskFlow Pro dashboard.
    2. Scroll down to the NOTIFICATIONS section near the bottom.
    3. Click the Push button to toggle it ON (it turns green).
    4. Pick which events you want notifications for: BE, Part.Cls, DD Limit, Trail SL (more on these below).
    5. Click SEND TEST NOTIFICATION to verify everything is wired up correctly.

    If you receive a test notification on your phone, push is fully working. From now on, any matching event RiskFlow Pro detects will ping your phone.

    Part 2 — Email Alerts via Gmail (or Other SMTP)

    MT5 sends email through any SMTP server. Gmail is the most common choice because every Gmail account works as a sender — but it requires a special App Password rather than your regular Gmail password. This is a one-time setup, then it just works.

    Step A: Create a Gmail App Password

    Prerequisite

    You must enable 2-Step Verification on your Google account before App Passwords becomes available. Go to myaccount.google.com → Security → 2-Step Verification and finish setup if you have not already.

    1. Go to myaccount.google.com and sign in.
    2. Click Security in the left sidebar.
    3. Scroll to 2-Step Verification and click into it. Scroll to the bottom and click App passwords.
    4. In the App name field, type MetaTrader5 and click Create.
    5. Google shows a 16-character password in the format abcd efgh ijkl mnop. Copy it now and store it somewhere safe — this is what you will paste into MT5 instead of your real Gmail password.

    Important

    The App Password is shown only once. If you lose it, Google will not show it again — you have to delete it and create a new one. Treat it like a password to your account, because effectively it is one.

    Step B: Configure SMTP in MT5

    1. Open Tools → Options → Email.
    2. Check the Enable checkbox.
    3. Fill in the fields using the values in the table below.
    4. Click Test. A test email should arrive in your inbox within a minute. If it lands in spam, mark it as Not Spam so future alerts arrive normally.
    5. Click OK to save.

    Gmail SMTP settings:

    • SMTP server: smtp.gmail.com:587
    • Login: your Gmail address (e.g. yourname@gmail.com)
    • Password: the 16-character App Password from Step A — paste it without spaces (e.g. abcdefghijklmnop)
    • From: your Gmail address (same as Login)
    • To: wherever you want alerts to land (your Gmail or any other inbox)

    Other SMTP Providers

    Not on Gmail? Most major providers work — they all use SMTP on port 587 with SSL/TLS:

    • Outlook / Hotmail: server smtp.office365.com:587 — uses your regular Outlook password (no App Password needed in most cases).
    • Yahoo Mail: server smtp.mail.yahoo.com:587 — like Gmail, requires an App Password generated under your Yahoo account security settings.
    • iCloud Mail: server smtp.mail.me.com:587 — requires an app-specific password from appleid.apple.com.

    Step C: Enable Email in RiskFlow Pro

    Same flow as push: go to the Protect tab, find NOTIFICATIONS, and toggle Email ON. Click SEND TEST NOTIFICATION and check your inbox to confirm.

    Choosing Which Events Trigger Alerts

    RiskFlow Pro fires notifications for four event types. You toggle each one independently in the NOTIFICATIONS section. Here is what each event means and when you actually want it on.

    BE (Breakeven). Fires when your stop loss has been moved to the entry price. Sample message: Breakeven moved | ticket 123 | SL→1.08500. Useful for psychological reassurance — you know the trade is now risk-free even before checking the chart.

    Part.Cls (Partial Close). Fires when a partial close has executed at the configured R multiple. Sample: Partial Close L1 fired | 50% @ R=1.00. Useful when you want to know that profit has been banked and the runner portion is now in play.

    DD Limit (Daily Drawdown Limit). Fires when your daily drawdown limit has been hit and trading is locked. Sample: Daily DD HIT [FTMO Rel] | Trading LOCKED. Always keep this one ON if you trade prop firm challenges — it is the single most important alert.

    Trail SL (Trailing Stop Move). Fires every time the trailing stop moves. Sample: Trail SL moved | ticket 123 | SL→1.08520. Useful for visibility on long-running trades, but can become noisy on lower timeframes.

    Practical Tip

    For most traders, the optimal default is: BE on, Part.Cls on, DD Limit on, Trail SL off. Trail SL produces too much noise during trending sessions — every tick that moves the trail sends an alert. Turn it on selectively when you are watching a specific runner trade.

    Common Issues and Fixes

    Push test does not arrive on phone. Most likely the MetaQuotes ID has a typo, or the MT5 mobile app’s notifications are blocked at the OS level. Re-check both. On the phone, also confirm you are signed into the same MT5 mobile install where you originally read the ID — uninstalling and reinstalling generates a new ID.

    Email test returns an error in MT5 Journal. Look at the error code. If it says authentication failed, you used your real Gmail password instead of the App Password — go back to Step A. If it says connection refused, double-check the SMTP server and port (Gmail uses port 587, not 25 or 465).

    Email test arrives in Spam, not Inbox. Gmail flags MT5-style auto-mail aggressively. Open the spam message and mark Not Spam, or create a Gmail filter for the sender address that forces it into the inbox. After one or two trades the filter usually learns.

    Worked for a while, then stopped. Free Gmail accounts have a daily SMTP send limit (around 500 messages). If you have Trail SL on with high-frequency trading, you can blow through this. Turn off Trail SL or switch to Outlook (which has a much more relaxed limit).

    Journal shows error 4014 or 4510. Error 4014 means the MetaQuotes ID is missing or push is not enabled in MT5 Options. Error 4510 means SMTP is not properly configured or your computer cannot reach the SMTP server (firewall, no internet, or wrong server name).

    Quick Reference

    For when you forget the steps and need a 30-second recap:

    Push: Phone → MT5 app → Messages → New Message → copy 8-digit MetaQuotes ID. Then desktop → Tools → Options → Notifications → Enable + paste ID + Test. Then RiskFlow Protect tab → Push ON + select events.

    Email (Gmail): myaccount.google.com → Security → 2-Step Verification → App passwords → create one named MetaTrader5 → copy 16-char password. Then desktop → Tools → Options → Email → Enable, server smtp.gmail.com:587, login = email, password = App Password, From/To = email → Test. Then RiskFlow Protect tab → Email ON.

    Where to Go From Here

    If you have not used RiskFlow Pro before and you are wondering how to get the dashboard onto your chart in the first place, the Quick Start Guide covers download, install, and your first trade in under 5 minutes.

    For deeper coverage of the Protect tab — including the four daily drawdown calculation methods, the floor line on the chart, and exact FTMO setup recommendations — see the Advanced Features Guide. The Protect tab section walks through each setting in detail, including which combinations work best for prop firm challenges versus standard live accounts.

    Get RiskFlow Pro

    Free MT5 Position Sizing & Trade Management

    Position sizing, trade management, prop firm protection, and built-in alerts. All from one compact dashboard on your MT5 chart.

    Download Free on MQL5 →

    Works on any MT5 broker account · No registration on our site required

    Hit a setup problem not covered above? Leave a comment on the MQL5 product page — that is where I read and respond.

  • RiskFlow Pro Quick Start: Your First Trade in Under 5 Minutes

    RiskFlow Pro Quick Start: Your First Trade in Under 5 Minutes

    Tutorial · MT5 · Free Tools · 8 min read

    You just downloaded RiskFlow Pro from MQL5. Maybe you are tired of opening Excel every time you want to calculate lot size. Maybe you blew a prop firm challenge last week because you forgot to move your stop to breakeven. Maybe you just want a cleaner way to trade manually.

    Whatever brought you here, this guide gets you from zero to your first properly-sized trade in under 5 minutes. No fluff, no backstory on why risk management matters. Let us just get the thing running.

    What You Will Have By The End

    A working RiskFlow Pro dashboard on your chart, your personal risk settings dialed in, and one practice trade placed correctly with a calculated lot size.

    Before You Start

    Make sure you have these three things ready:

    • MetaTrader 5 installed and logged into a broker account. A demo account works fine for practice.
    • RiskFlow Pro downloaded from the MQL5 Market. If you have not downloaded it yet, grab it at the link at the bottom of this article.
    • Algo Trading enabled in MT5. Check the top toolbar — the Algo Trading button should be green, not red.

    Step 1 — Attach RiskFlow Pro to a Chart

    1. Open any chart you want to trade on. Gold, EURUSD, US30, whatever you usually trade. The timeframe does not matter — the EA works on any timeframe.
    2. In the MT5 Navigator panel (left side), expand the Expert Advisors folder. You will see RiskFlow Pro there.
    3. Drag RiskFlow Pro onto your chart. A settings window will pop up.
    4. In that window, make sure Allow Algo Trading is checked. You do not need to check Allow modification of Signals settings — that is unrelated.
    5. Click OK.

    You should now see a dashboard appear in the top-left corner of your chart. Six tabs across the top: Trade, Manage, Session, Protect, Settings, and Journal. The smiley face in the top-right corner of MT5 should be there too, confirming the EA is running.

    Troubleshooting

    If you do not see the dashboard, check that Algo Trading is actually enabled (the button in the MT5 toolbar should be green). If the dashboard shows but looks cut off, drag it to a less crowded part of your chart.

    Step 2 — Set Your Risk Profile

    This is the most important step. You only need to do it once, then the EA remembers.

    1. Click the Settings tab on the dashboard.
    2. You will see a Risk Type button at the top. Click it to cycle through four options:
      • % Balance — Risk a percentage of your total account balance. Most common choice.
      • % Equity — Risk a percentage of current equity. Useful with many open positions.
      • Fixed $ — Risk a fixed dollar amount every trade.
      • % Free Margin — Risk a percentage of available margin.
    3. In the Value field, enter your number. For example, if you chose % Balance and want to risk 1% per trade, type 1.0.
    4. Set your R:R Ratio. This is how RiskFlow Pro auto-calculates your take profit. For example, 2.0 means your take profit will be set at 2x your risk distance. Leave blank if you prefer to set TP manually.

    That is it for setup. The EA now knows exactly how to size every trade you make going forward.

    Step 3 — Place Your First Trade

    Go back to the Trade tab. You have two ways to enter a trade — pick the one that fits your style.

    Method A: The Simple Way (Market Order)

    1. Click the MARKET button. It turns green.
    2. In the SL field, type your stop loss price. For example, if gold is at 2650 and you want to stop out at 2645, type 2645.00.
    3. Leave TP blank (RiskFlow Pro will auto-calculate from your R:R ratio) or type a specific TP price.
    4. Look at the Lot display. It shows the exact lot size calculated from your risk settings and SL distance. Also check Margin — green means you have enough, red means your risk setting is too high for your account.
    5. Click BUY or SELL. Order goes through at market price.

    Method B: The Visual Way (Drag Lines)

    This is where RiskFlow Pro shines. If you have ever wanted to just drag your SL and TP around on the chart and see your lot size update live, this is for you.

    1. Click the LINES button. It turns green.
    2. Three colored lines appear on your chart: blue (Entry), red dashed (Stop Loss), green dashed (Take Profit).
    3. Drag any line to the level you want. The dashboard updates everything in real time — lot size, R:R ratio, margin, and order type.
    4. When you like what you see, click BUY or SELL.

    That is your first properly-sized trade. The blue, red, and green lines stay on your chart until the position closes, so you always know your levels at a glance.

    Step 4 — Let the EA Manage the Trade

    This is the part most traders skip, and it is also the part that separates profitable traders from the rest. Click the Manage tab.

    For your first trade, turn on just one thing: Breakeven.

    1. Toggle the BE button to ON. It turns green.
    2. Set Trigger R to 1.0. This means when price moves 1x your risk distance in your favor, the EA will move your stop loss to your entry price automatically.
    3. Set Offset pips to 2.0. This adds a small buffer so your stop sits just above (or below) entry — making breakeven actually a small profit to cover spread.

    Now walk away. When the trade works out, your stop moves to breakeven automatically. When it does not, your original SL protects you.

    Why This Matters

    This one setting alone will change your trading. No more “I should have moved my stop” regrets after a winner turns into a loser.

    Step 5 — Bonus: Turn On Prop Firm Protection

    If you are running an FTMO or other prop firm challenge, this takes 30 seconds and can save your entire account.

    1. Click the Protect tab.
    2. Toggle Daily DD Limit to ON.
    3. Click the DD Type button and set it to FTMO Rel (or whichever method your prop firm uses).
    4. Set the limit value. For FTMO, enter 4.0 for the 4% daily drawdown limit, or 4.5 if you want a small buffer.

    Done. The EA now watches your equity every tick. If you ever get close to the daily drawdown limit, new trades are blocked automatically. The floor line even shows you how much you have left to lose before the limit triggers.

    What to Do Next

    You have the basics working. That alone already makes you faster and safer than 80% of manual traders.

    If you want to go deeper — trailing stops, partial closes at multiple levels, OCO pending orders, virtual SL/TP stealth mode, and the full trade journal — the Advanced Features guide covers every tab in detail with real trading examples.

    Want alerts pushed to your phone when trades hit breakeven or your daily drawdown limit triggers? The MT5 notifications setup guide walks through push and email alerts end to end.

    Get RiskFlow Pro

    Free for the First 500 Downloads

    A professional manual trading dashboard. Position sizing, trade management, and FTMO risk protection — all in one compact panel on your chart.

    Download Free on MQL5 →

    Works on any MT5 broker account · No registration on our site required

    Found this guide useful? Leave a rating or comment on MQL5 — it helps other traders discover RiskFlow Pro, and helps me prioritize which features to add next.